Digitalpassameter 3903
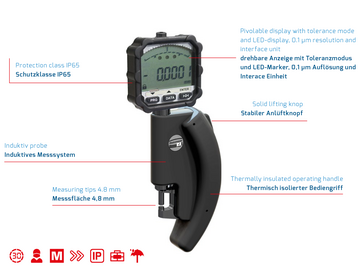
Digital micrometer with turnable LED display and tolerance mode, device temperature monitoring, USB interface and optional software
Short description
- Standard: DIN 863 | DAkkS calibrated according to DIN EN ISO/IEC 17025:2018
- Measuring range: 0 - 205 mm (depending on version)
- Resolution: < 0,0001 mm (< 0,1 µm) / conversion mm/inch possible
- Display: LCD display (turnable) with tolerance deviation, device temperature monitoring
- Data interface: Triple I (USB cable or wireless)
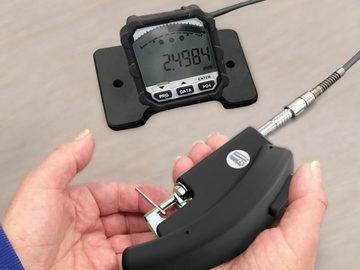
- Optionally available: software, separation of measuring body and display
Detailed information
Passameters are adjustable snap gauges, which are mostly used for measuring and testing of round-cut and milled parts. They replace a large number of fixed gauges whilst this device also has the advantage of a number display if there are deviations to the preset value.
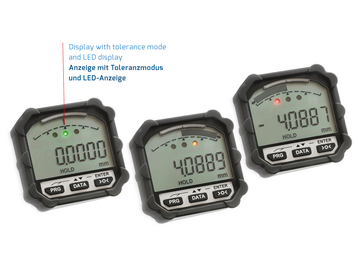
The digital passameter 3903 has a lightweight measuring body with a novel inductive measuring system with 4 mm completely fine measuring range. The gauging force of the measuring system can be selected from approx. 0.7 N, 1.2 N or 2.0 N as a factory setting. Temperature fluctuations on the measuring body are recorded through an integrated sensor and signalled when a limit value is exceeded. Measuring body and display unit can be operated separately due to the modular structure. This simplifies series measuring at the workstation and does not add any disruptive moments into the measurement. Measuring sensor and display are then connected with an optional cable and can be positioned freely. In addition to digital numbers in the display module, there are also precision indicator bars and color LEDs available for “good” - “bad” selection.
The configuration is processed with device keys or additional software. Thus, it is also possible to activate and set functions, such as preset value, bar areas, LED colours, measuring modes, or password.
| Article | Digitalpassameter 3903 |
| Standard | DIN 863 |
| IP protection class | IP 65 |
| Measurement | digital |
| Product type | passameter, adjustable snap gauge, micrometer |
| Resolution (mm) | < 0.0001 mm (< 0.1 µm) |
| Resolution (inch) | < 0.000005 inch |
| Repeatability | < 0.0002 mm (< 0.2 µm) |
| Flatness (measuring surfaces) | < 0.0003 mm (< 0.3 µm) |
| Parallelism (measuring surfaces) | < 0.0006 mm (< 0.6 µm) |
| Diameter (measuring surfaces) | 4.8 mm |
| Measuring stroke of the sensor | 4 mm |
| Measuring force standard | 1.2 - 2 N |
| Measuring force special | 0.7 N |
| Weight (version 0 - 30 mm) | 0,38 kg |
| Weight display unit SD1 | 0,24 kg |
| Interface | Triple I (USB cable or wireless) |
| Software functionality | Yes |
| Display / digit height | 7 digits / 10 mm |
| Turnable display element | Yes |
| Unit change | mm / inch |
| Display options | MIN / MAX / BEAT / MW / - measurement mode |
| Conversion factor - Measurement mode | Yes |
| Reference mode | I / II |
| Tolerance input | Traffic light function, acoustic output |
| Reversal of measuring direction | Yes |
| Key lock | HOLD function |
| Device temperature monitoring | Yes |
| Automatic power off | Yes |
| Battery | CR2032 |
| Operating time | approx. 2000 h |
| Versions / Application range | 0 - 205 mm |
| Measuring surfaces made of CBN | on request |
| Packing | stable box |
| The optional software FMS-S01 offers the option to configure the digital passameter also directly through a cable on the PC. This allows functions such as calibrations, LED functions and colors, bar displays, measurement modes, or password protection to be activated and set. | |
- High measuring accuracy with resolution of 0.1 µm
- Small measuring areas of 4,8 mm
- Completely fine measuring range of 4 mm
- Measuring body and display elements can be separated
- Simple series measuring also at the workstation or in goods receiving area
- Low gauging force, can be selected from 0.7 to 2.0 N
- High repeatability of < 0.2 µm
- Large display with optional interfaces
- Programmable LEDs for limit value specification
- Device temperature monitoring for secure measurement
Accessory
- Separation set for measuring body and display
- Interfaces for USB or wireless data transfer
- PC software IBR Simkey for USB and wireless data transfer
- PC software FMS View for wireless data transfer
Software FMS View
The optional software FMS-S01 offers the option to configure the Digital Passameter also directly through a cable on the PC and to transfer measured values, e.g.:
- display of the current values of different digital devices
- multi-channel function i.e. parallel display of up to 10 different devices
- extensive transfer function of the values into Microsoft Excel
- protocol formats or device types: Sylvac Duplex, Sylvac Simplex, IBRit-md 1, Heidenhain ND, TESA GTLXX USB, ALMEMO, MAHR 16EXu, PU 11, PU 23, PU 26, PU 60, PU 300, MFP Control, PU 36, IK220, Solartron Orbit3
> more about the software
| Application ranges (special sizes and custom measuring surfaces on request) | ||
| Measuring range | Measuring force | Order no. |
| 0 - 4 mm | 0,7 N | 76 3903 011 20 |
| 0 - 4 mm | 1,2 N | 76 3903 001 20 |
| 0 - 4 mm | 2,0 N | 76 3903 021 20 |
| 4 - 8 mm | 0,7 N | 76 3903 012 20 |
| 4 - 8 mm | 1,2 N | 76 3903 002 20 |
| 4 - 8 mm | 2,0 N | 76 3903 022 20 |
| 8 - 12 mm | 0,7 N | 76 3903 013 20 |
| 8 - 12 mm | 1,2 N | 76 3903 003 20 |
| 8 - 12 mm | 2,0 N | 76 3903 023 20 |
| Accessory | ||
| Separation set measuring body and display | 76 3903 090 25 | |
| ind. probe cable, stand SD1 and sleeve | ||
| Software and data transfer | ||
| Transfer | Description | Order no. |
| Cable | PC interface Triple I to USB | 80 0091 380 94 |
| Cable | PC software IBR Simkey | 81 0000 000 13 |
| Wireless | PC interface RF1* Triple I to receiver USB | 81 0000 000 16 - 81 0000 000 11 |
| Wireless | PC software IBR Simkey | 81 0000 000 13 |
| Wireless | PC software FMS View | 76 4104 964 20 |

![[Translate to English:] Digitalpassameter zur Überprüfung von filigranen Bauteilen mit hoher Messgenauigkeit und geringer Messkraft](/fileadmin/feinmess-suhl/user_upload/images/03_Handmessmittel/3903_1_digital-passameter-adjustable-snap-gauge-micrometer-rotary-ledmeasurement-toleranz-voreinstellung-precise-drehteil-mikrometer-verstellbar-rachenlehre-software-datenuebertragung-feste-lehre.png)


